TecZone Laser Reference Manual

  • Welcome to TecZone Laser
  • Introduction
    • Installing TecZone
    • TecZone Laser User Interface
    • Workflow Panel
    • Machine Database
  • Basic Workflows
    • Part Workflow
      • Load Part
      • Sketch Mode
      • Measure
      • Modifying Laser Part
      • Nesting
      • Sequence Navigator
      • NC Code Generation
    • Job workflow
      • Create Job
      • Set Laser Technology Table (LTT)
      • Nesting
      • Automatic Part Placement
      • Manual Part Placement
  • Advanced Topics
    • Geometry import options
    • Advanced Tooling Options
      • Editing Microjoints
      • TwinLine
      • FlyLine
      • Dimple Approach
      • Remainder Sheets
      • Skeleton Cuts
      • Pie-slug Circular Holes
      • Avoid Retooling Pierces
      • Finishing Rules
      • Clone LTT
    • Advanced Nesting Features
      • Mirrored Parts
      • Find a Part in Nest Layout
      • Filler parts in Nest Layout
    • Advanced Tooling Optimization
      • Contour Quality
      • Process Stability
      • Optimizing Stability with Scrap Cutting
      • Optimizing Tilting Behaviour
      • Space Out Slice Cuts to Avoid Collision
      • Minimize Number of Different Layouts
      • Dynamic Level Setting
    • Advanced Menu Options
      • Context Sensitive Menus
      • Hierarchy of Settings
      • Mult-Selections
      • CSV Output
    • Hand Drawn Sheet Slicing Cuts
    • Text on Parts
    • Generate Customized Reports
  • Application Settings
    • Drawing
      • Layers
      • Dimensions
      • View
    • Cut CAM
      • Layout
        • Nest Settings
        • Sheet
        • Sheet Handling
        • Skeleton Cuts
        • Work Support
      • Laser CAM
        • Cut Outputs
        • Cut View
    • Reports
      • Item Defaults
    • Import/Export
    • Environment
  • Impressum
Application Settings
/
Drawing
/
Layers

Layers

layers

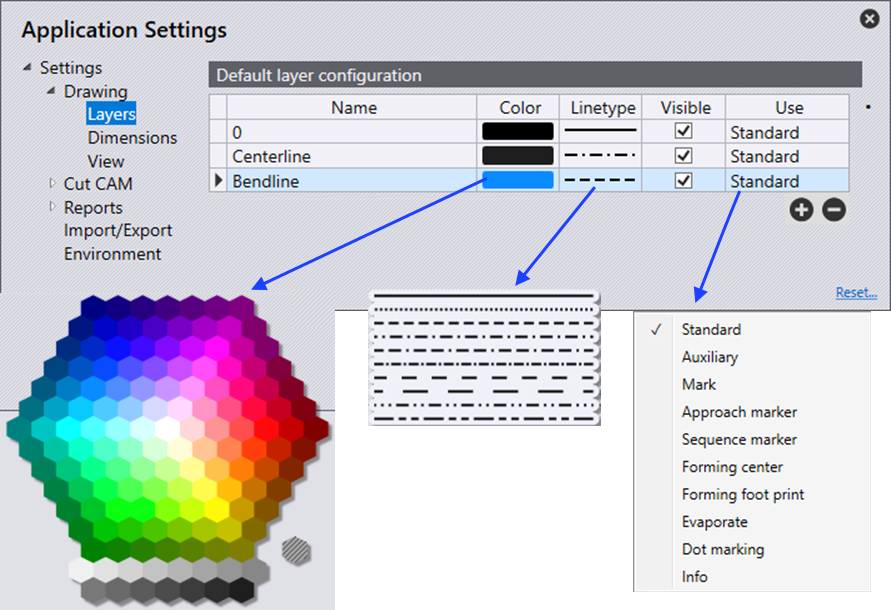
The default layer configuration can be set to show different elements of a part when drawing.

Name - This is the name of the layer to which the geometry will use.

Colour - A spectrum of colours can be chosen here to show different elements in the part.

Linetype - This is the type of line to be used to show the layer, represented through dots and dashes.

Visible - Select the checkbox for the layer to be visible or turn it off for the layer to not be seen in the drawing.

Use - This is the use of the element of the layer. The different options available are:

  1. Standard - This is the standard layer to be used for CAM.

  2. Auxiliary - An auxiliary layer, not to be used for CAM.

  3. Mark - Any entities in this layer will be marked, not cut.

  4. Approach marker - Point entities indicating laser approach position.

  5. Sequence marker - Text markers are indicating the sequence order of contours.

  6. Forming centre - Centre mark for forming (point or small L).

  7. Forming footprint - The outline (footprint) of a forming.

  8. Evaporate - This layer would be used to distinguish film burning.

  9. Dot marking - This layer would be used for QR codes.

  10. Info - This is an information-only layer.

Example

Different colours or line types can be used to differentiate between a polyline and a bend line.

Drawing Dimensions

      Copyright © 2024 TRUMPF Werkzeugmaschinen SE + Co. KG. All rights reserved.

    Compiled by Bento